This Luck Marquee sign is the perfect home decor or DIY craft to get festive and celebrate St. Patrick’s Day. My friend, Michelle, created this beautiful piece of art and is sharing her tutorial so that you can make it yourself!

St. Patrick’s Day Luck Marquee Sign Tutorial
My name is Michelle James and I blog at michellejdesigns.com. I am a crafter, re-purposer, scrapper and paper hoarder. Oh, and I work for the Clerk of Court during the day. My husband Jeff and I moved to Iowa 20 years ago from California. We live in a small town in Northwest Iowa called Emmetsburg.
Emmetsburg has a large Irish community and a huge St. Patrick’s Day celebration that starts with the crowning of Miss Shamrock and ends with a grand parade. I am pretty sure our little town doubles in size for that parade. Sometimes it is freezing cold and sometimes it is quite warm. Either way….the parade must go on!
So it is only fitting that I create a St. Patrick’s Day home decor project for you. I hope you enjoy it.
Supplies Needed:
Ten Pieces of lath (wood purchased at Menard’s or Home Depot) each piece needs to be cut to 20 inches long.
Two pieces of 1×2 (which actually measures 3/4″ x 1 1/2″) cut to 18 1/2″
Two pieces of 1×2 cut to 15″.
Brad nailer or a heavy duty nail gun – Jeff has a nail gun attached to his air compressor that works well.
Wood stain – we used dark walnut
Acrylic paints – White and three shades of green (dark, medium and light)
Assorted paint brushes and chip brush
Small roller
Template for letters and shamrocks – I cut them with my Silhouette Cameo
Pencil
Drill with 13/64’s inch drill bit – this is not a popular size but it fits the lights perfectly.
Let’s get started on making our St. Patrick’s Day Luck Marquee sign!
First you will be building the board. My husband does all of this for me so I am relying on his words. LOL!
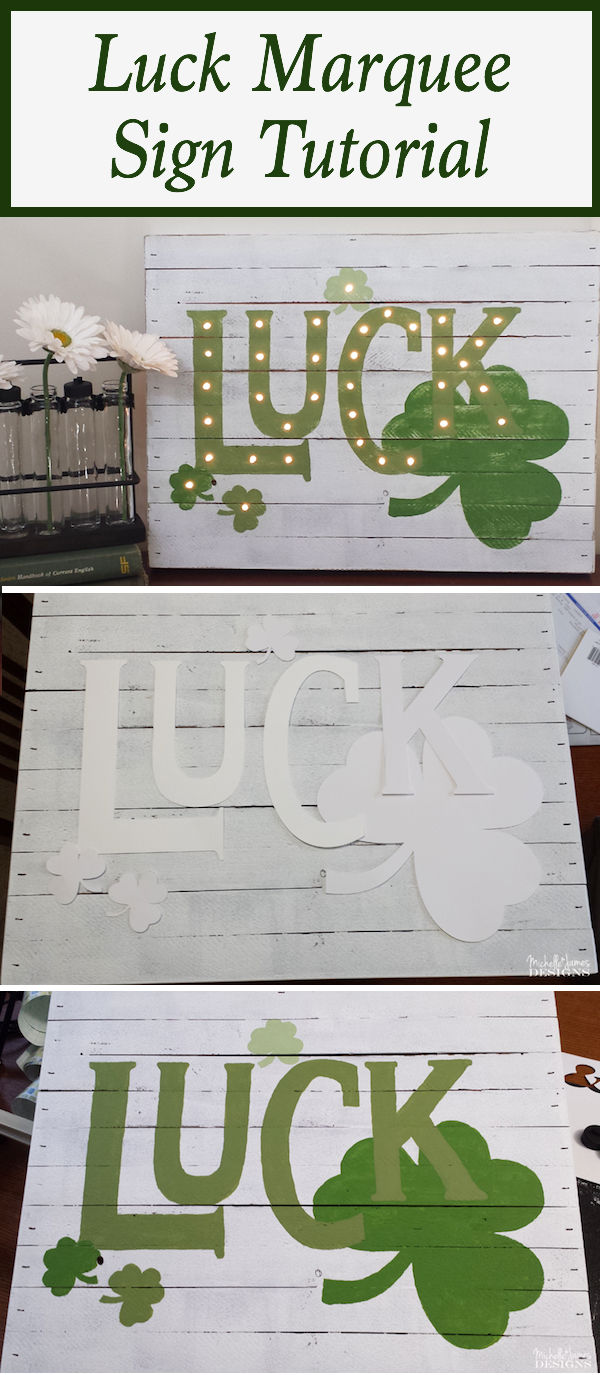
This is what it looks like when it is done without any paint.

Starting with the frame part, stand the 18 1/2 inch 1×2 boards on their ends one for the top and one for the bottom of the frame. Then place the 15″ boards as the left and right sides on the outside of the boards. Make sure the edges are even and they are square then glue and nail them into place. This will give you a frame to nail the lath boards onto.
Lay the ten lath boards on top of the “frame” and glue and nail them in place right next to each other. You only have to nail up the left and right sides.
Sand it a little bit so you don’t get splinters while you are working on it. I really love the sanding blocks.
Then stain it using the dark walnut stain. We used the really cheap small brushes for the stain. The sponge brushes would probably be torn apart by the wood.

After the stain dries. Depending on the weather where you are it may take longer. It is cold, cold here in Iowa this time of year. We let it dry for two days. I know we are painting it white but when it is distressed the stain shows through and it looks nicer than the light wood. If you are not planning to distress the project then the staining step could be omitted.
Then using the white acrylic paint and the small roller, paint the entire board white. It does not have to have several coats since we want it to look distressed but it should be totally covered.
Next you will need to cut out your letters and shamrocks. If you do not have a Silhouette (or a Cricut) you can print out your letters and shamrocks the size you want and cut them out to use as a template.
I purchased the shamrock from the Silhouette store. It was actually a set of five shamrocks. I used one and erased the others from the screen. The letters are a block font. Any will do. Just make sure you like it. This is really a trial and error process until you get the right size. I only had to cut my letters out once but I tried several sizes of shamrocks.
Here is my design laid out on the white board.

I wanted the word “Luck” to have a little bit of interest so I made the U and the K a bit smaller than the L and the C. I think it looks nice. Then I cut out three small shamrocks and one very large shamrock. Again, you can cut out whatever design you like.
Now we need to trace around the design. I used a pencil since the board was white.

Now the fun painting begins. I used a medium size, angled flat brush for my painting. This helps me to keep the edges somewhat crisp and to be able to fill in the centers as well.
There are a couple of places where the design overlaps so I wanted the darker color to be on the bottom. I started with these. Be sure to cover your pencil lines. They do not sand off easily.

As you can see this shamrock color needed two coats. It doesn’t have to be perfect though because we will be distressing after all of the paint is done.
In the photo above you can see that now my pencil lines have been covered up for the C and the K. So I just place the letter template back onto the board and re-traced over the green paint.

You can also see how much better the shamrock looks with the second coat. Next I painted my letters and the rest of my shamrocks. I had three shades of green. I used the darkest shade (the link above is a set of three paints. I used the Palm Leaf. It is way too expensive on Amazon but I wanted you to see what it looks like) on the large shamrock and one of the small shamrocks. Then the middle shade I used on the letters and one of the small shamrocks. And the lightest shade was just used on the third small shamrock.
Here it is with the painting all done.

After the paint is completely dry, use a sanding block to distress the entire board.
Then you will need your pencil to mark the holes for the lights. Remember there are 35 lights total. (just a tip – count the actual lights on your string before throwing your receipt away. During my XOXO Valentine Marquee class we had strings of 50. Some of them contained 49 and one string only had 48.)
So plan accordingly so you end up with 35 holes that are spaced fairly evenly. I also wanted one light in each of the small shamrocks so I counted those as well.

Once you have triple counted the pencil marks go ahead and drill the holes. Again…I am spoiled and my husband does this for me. Although I could probably handle this part. LOL!

Here it is! Now you can see an extra hole on the left side by the small shamrock. This is actually a knot in the wood. I did end up with 35. Yay!
The final step is to add your lights.
So, you will be working from the back of the piece and you will need to prop the top up onto something so the lights can poke through.
Start with the plug in part and make sure it is at the bottom. Start in the lowest hole on one side or the other and slowly work your way up and down the board using every light and every hole. If you skip one you need to push out the bulbs from the front (instead of pulling them out from the back) until you get back to the skipped light (or hole) and then continue.

Then plug it in and display it with pride! I just love the way these turn out and they are very popular for my classes. You can see the other St. Pat’s marquee sign we will be making in my class!


Happy St. Patrick’s Day to all of you!
Leave A Comment